Adobe Photoshop CC 2018
Students have the liberty to use Pixlr Editor if they don't have a Photoshop software at home. Both Pixlr editor and Photoshop have similar tools/functions.
--Tools in Photoshop --
1) Crop
2) Selection Tools (Marquee, Lasso, Wand)
3) Sponge Tool (To enhance the color of the subject)
4) Dodge Tool (To lighten certain part of the image)
5) Burn Tool (To Darken certain part of the image)
6) Color Replacement Tool (replacing color of the subject without affecting the shape and texture)
7) Color picker (Pick the color of your choice within the image)
8) Adjustments tab ( Found in the top page of Pixlr - Levels, Curves, Brightness/Contrast, Hue/Saturation, Color Balance
9) Color Balance,Hue/Saturation, Levels, Curves, Exposure
10) Change Background of an Image
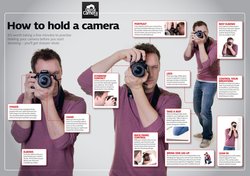
3 PILLARS OF PHOTOGRAPHY
Aperture
- The opening in the camera lens that is responsible for taking in light
- The bigger the aperture, the more light can pass through
- Big aperture is responsible for large depth of field
- Small aperture, shallow depth of field
- Adjust aperture in the camera using f/stop
Shutter Speed
- The length of time a camera shutter is open to expose the light into the camera sensor
- Fast shutter speed, motion freeze
- Slow Shutter Speed, motion blur
- When shutter speed is fast, lesser light goes in due to short exposure time
- Therefore, there are two things you need to bear in mind; Is there plenty of light? Is the subject moving or still?
ISO
- Its the level of sensitivity the camera is to available light
- The bigger the ISO number, the more sensitive the camera sensor is. Hence, picture will be brighter
- However, the large ISO numbers tends to cause picture to me grainy
- So when you're taking picture in a place where there is plenty of light, keep ISO to 100 or 200
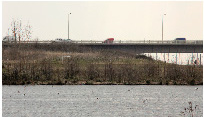
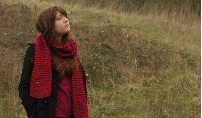
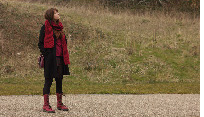
DIFFERENT SHOT SIZES
Long Shot - A full shot displays the character from head to toe, without showing much of his surroundings
Wide Shot - Usually show buildings, street scenes or landscapes. Its to tell the audience where the picture was taken
Medium Shot - Showing most of the subject's body. Above the knee onward
Close up - Subject occupies most of the frame giving very little information on the surrounding
Extreme Close Up - Known as detailed shots. This shot is used to give off details to the audience


WEEBLY
On week 5, you'll learnt on how to create your website/blog using weebly. You will need 5 navigation tabs.
They are Home, About, Science, Art and Ict. The website you created is a platform for you to showcase your school work.
I have attached a tutorial here to help you understand the usage of Weebly.
MOBILE APP (MIT APP INVENTOR 2)
1) Log in using your school email (canberrasec.net)
2)After logging in, click on the "Start New Project on the left" otherwise open up any existing project if you want to continue working on your existing work.
3) Area 1 : Palette
- In this area, you will see user interface, Layouts, Media etc
- These tools will help you build design part of the app
Area 2: Viewer
- You will see the screen like how it appears on your phone.
- You can see the screen as you build your app
- Connect MIT App Inventor to your phone by clicking the connect button at the top of the screen, followed by AI Companion
- Please ensure you have the AI2Companion app in your android phone.
Area 3: Components
- The tools you are using for your app, will appear at this area for you to rename (if you want).
Area 4: Properties
- Upon clicking on those individual components you can customize them according to your preference.
---These 4 areas are found only under the designer section. To make the features work, you will need program the tools. This can be done when you switch to the Blocks section. The Designer button and Blocks button are side by side on the top left side of the screen---
---Please refer to the tutorials below---
- https://www.youtube.com/watch?v=dtAxz9nNoJs
- https://www.youtube.com/watch?v=Vdo8UdkgDD8&t=9s
- https://www.youtube.com/watch?v=0hikoCvM3oc&t=1s
- https://www.youtube.com/watch?v=I0rwo7z032U&t=473s
